Object destructuring with JavaScript

Here is something I see very often while reviewing Angular code for the Angular certification program:

While the above code works, it is very lengthy and repetitive. It also increases your code base’s size, negatively impacting performance. Instead, we can use a modern JavaScript syntax introduced with ES6/ES2015 called object destructuring:

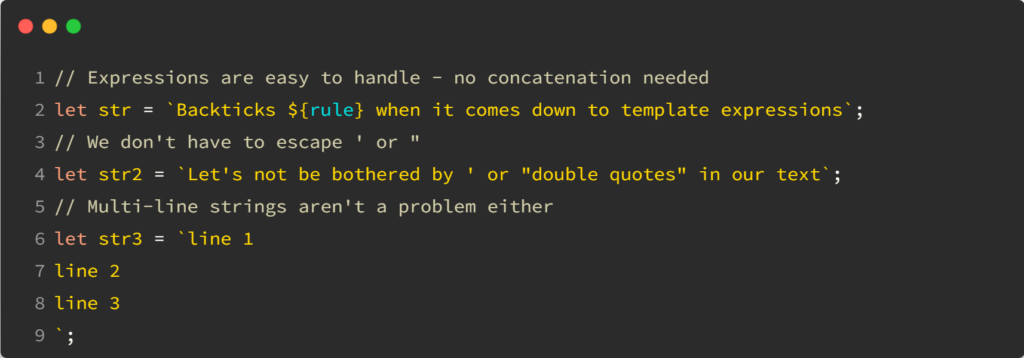
The above line of code does the same as the three previous lines. What if we want the local variable to have a different name than the original property? Say we want to name our new variable homeAddress instead of address. We can do it like this:

What if we want those variables to have a default value in case they are not defined in this.user? We can do that too:

Now you know everything you need about object destructuring.

How to handle drag-and-drop with Angular?

Drag and drop features can dramatically improve the UX of a web application. Implementing drag and drop with Javascript seems intimidating, which is why we have the Angular CDK (Component Development Kit).

Let’s say we have a list of items we want to be able to reorder using drag and drop:

Thanks to the CDK drag-and-drop directives, such a task is easy. Here’s all the code needed to enable it:

The two directives cdkDropList and cdkDrag enable the drag-and-drop feature. We also need the following code in our component class:

The moveItemInArray function is a utility function from the CDK, so we don’t have to worry about that.

See the source code and try this example in action on Stackblitz here.

State Management: Effect

Let’s get back to our series on state management with this post. So far, we covered that state management libraries give us a global State that gets updated using Actions and Reducers. I haven’t told you yet that typical Redux Reducer functions are meant to be synchronous. In other words, you’re not supposed to make an HTTP request or anything asynchronous in a reducer.

So, how do we implement asynchronous tasks? This is known as a side-effect (because it involves a third party such as a server) or just Effect.

When we use Effects, the idea is to have an Action that triggers the Effect, and once the Effect completes, another Action is triggered:

For instance, in our current switcher example, we could have an Action called LOAD_EXCHANGE_RATES. This Action would trigger an Effect to make an HTTP request and fetch exchange rates from an API. For instance, the original Action would also update the State to make it a “loading” state.

Then, once the HTTP request completes, the Effect would dispatch another action, EXCHANGE_RATES_LOADED and pass the data as its payload so it gets stored in the State.

Effects are implemented differently based on the state management library

  1. NgRx

NgRx effects rely heavily on RxJs and look like this:

As you can see, the Effect code is verbose, but every single step makes sense: We turn an action into an asynchronous request that dispatches other Actions upon success or failure.

If you want to learn more about NgRx, I have this video course on LinkedIn Learning.

2. NgXs

NgXs has a different approach and doesn’t have effects. Instead, all actions have four states by default:

As a result, action handlers (reducers) can use asynchronous requests without needing any effects:

As you can see, even if the Redux concepts remain the same, every state management library has a different approach. I like NgXs because of its simplicity. The code is more to the point and less reliant on RxJs operators.

Increasing binding specificity

Let’s say we want to trigger an action when the user hits enter on their keyboard. We could do something like this, capturing the keydown event and then decide what to do based on the entered key:

While the above works, it’s pretty verbose. Instead, we can make our binding more specific by doing the following:

Now, that’s a lot more specific and less verbose. The same goes for class bindings. Here’s a lengthy example:

Since all we want to do is toggle the green class on or off based on a boolean expression, the following syntax is shorter and better:

You can see these examples in action on Stackblitz.

State Management: Selector

We know how to create a State and dispatch actions to update its value. Now let’s see how to receive updates when the State gets updated.

Most state management libraries provide what is known as Selectors. A Selector query function runs against our State and returns an Observable. For instance, with NgXs, a Selector can be created with the @Select decorator as follows:

The above code creates an Observable that returns any value update in state.currencyInfo. If you don’t like decorators, you can also use the select function from the Store service:

Both options return a similar Observable. If a Selector of a slice of your State is used repeatedly, you can make it a memoized selector by using the @Selector decorator in your State class. This example creates a new selector that returns just the currency property of our State:

Such a Selector can be used with @Select decorator in your components/services as follows:

You can see that code in action on Stackblitz.

Using the CDK ListBox for custom list selection

The Angular CDK is an important toolkit for building Angular applications. We’ve already covered how to display an overlay using the CDK. Today, let’s create a custom list selection feature using CDK ListBox.

Often, HTML dropdowns are too basic to allow for meaningful customization of what gets rendered in the dropdown. This has led to the creation of several custom components, such as Material Select.

But what if you’re not using a library and still need to customize a list of items for your users? Something like this, for instance:

Implementing such a UI with HTML is not very difficult. The complexity of the task comes from getting all the expected behaviors for an accessible experience, such as keyboard interaction and focus management.

This is where the cdkListbox directive shines. Here’s an example:

The few lines of code in this example add the following select-dropdown-like features to these basic HTML list items:

  • A numerical value is associated with the user selection (1, 0, or -1) thanks to cdkOption
  • Typeahead is available. If I click on the list and then type “o” on my keyboard, the “Okay” option gets selected.
  • The current selection can be changed using the keyboard’s up and down keys.

And there are many more possibilities to explore. For instance, enabling multiple selections in the list is as easy as adding a cdkListboxMultiple attribute on our list element:

And now I can do this:

You can see that example in action on Stackblitz here. Another nice feature of the Angular CDK is that all its directives are standalone, so we can import just what we need in our components:

State Management: Action and Reducer

Now that we’ve covered what’s the global State and what’s the Store service, let’s take a look at how we can update that State. In our introduction to state management, we introduced Actions.

Actions are simple objects with a name/type describing what we’re trying to do. An optional payload contains the parameters for that Action. In our example of currency switcher, we want to change a currency, so we would create the following Action, where the payload is the new currency:

The above Action does absolutely nothing on its own. We need a reducer to implement the corresponding state transition. With NgXs, a reducer is a method with the decorator @Action in our State class:

In the above code, we define which method runs when the Action of type ChangeCurrency is dispatched to our state management library.

That method takes the current State, creates a copy of it (this is a core principle of Redux), and then changes the currency and exchangeRate in the new state object.

Then, NgXs will automatically notify any component/service/directive subscribed to that State that a new value has been set.

How to dispatch an action?

If we want to use the Action and Reducer created earlier, we use the only object that knows about everything in our state-management machinery: The Store.

Conveniently enough, our Store has a dispatch method that can be used for any Action:

As a reminder, the Store is a service that can be injected anywhere we need it:

We’ve covered most of the pieces of our state management architecture. We know how to create a State, an Action, a Reducer and use the Store to dispatch an action and update our State:

In our next post in this series, we’ll see how to Select and subscribe to specific parts of our State. You can see that example in action on Stackblitz.

5 useful pipes from ngx-pipes

ngx-pipes is a library with over 80 different pipes to choose from. Here is a list of 5 of my favorites:

timeAgo: An excellent alternative to Moment for duration formatting, which means turning a date/time into: “a few seconds ago” or “last week,” for instance.

ucFirst: Uses an uppercase letter for the first word in a sentence, unlike Angular’s uppercase pipe, which returns the entire string in uppercase.

filterBy: Filters an array of objects based on your criteria.

orderBy: The name says it all—orders items in an array based on a given property.

percentage: An excellent complement to the percent pipe. You can use the percentage pipe to compute the percentage value and then the percent pipe to format that value in any way you want.

You can find the complete list of pipes from ngx-pipes here. Note that those pipes are not standalone yet, but there’s a pull request to make that happen.

State Management: State and Store

After introducing state management concepts last week, let’s dive deeper and get into two essential concepts of state management libraries: Store and State. I’m using NgXs for these examples because the library’s syntax is the most straightforward and consistent with how Angular works, using Typescript decorators to configure the different classes.

The example we will be using is an online store where the user can change the currency and see the different prices get updated as a result:

We want to manage that currency and the exchange rate that goes with it using state management. The first step is to create a piece of State that handles that data – and provide a name and default value for it:

The above State has to be registered with the NgxsModule in our AppModule as follows:

And that’s it! Now, to interact with that State, we can use the Store service and inject it wherever we need it:

Of course, you can create multiple pieces of State for your application using the same approach as above. Every new part of our State gets added as a property to the global state object. For instance, our current currency information can be found at state.currencyInfo. If we add a new State with a name set to cartContents, its data would be accessible under state.cartContents.

In the next post of this series, we’ll see how to use Actions to update the application’s State. You can see that example in action on Stackblitz.

The Angular Accelerator is live!

I’ve been thinking for a long time about a way to bridge a gap in the training industry, which is mainly dominated by two options these days:

  • Corporate training or conference workshops: You attend a live session with a trainer for one or more days and touch on many topics quickly, but you can’t practice a lot with that new knowledge. It’s usually expensive and promotes quantity of instruction over quality.
  • Online courses: The scope of these courses is usually smaller and less in-depth, and the content doesn’t get adjusted to the audience. You can’t ask questions, you don’t practice, and since there is no time-blocking for these courses, it requires a lot of self-discipline to get the most out of them.

These thoughts gave birth to the Angular Accelerator. Over the course of a month (or more if you want to), you get challenged with 8 to 15 different exercises in an actual Angular application. Your expected involvement is around 30 minutes to 1 hour per day. You can get your code reviewed by myself and your peers and get access to solutions (both as a video walk-through and actual source code).

The Accelerator has several Slack channels where you can ask about anything and receive help. The Ultimate option also has weekly calls with me so you can ask questions and get live feedback.

Unlike video courses, you can get as much interactivity as you need and as much practice as you want!

Unlike live in-person classes, you or your employer won’t have to spend thousands of dollars!

Several people have already completed it, and the feedback has been exceptional so far:

“The quality of the course was exceptional, and the lessons went beyond what I had seen in other classes. I was able to learn advanced techniques I had yet to see before in a concise manner.”

“The Accelerator program has been truly engaging and enlightening, providing me with a wealth of knowledge and skills that I am eager to apply in my professional journey.”

If you’re interested or if you have any questions, let me know. My approach with the Accelerator is the same as what you can see in this newsletter: No BS, straight-to-the-point concise content that gets things done.

Also:

  • There is a 5-day free trial so that you can give it a try and cancel if you don’t like it (which has never happened so far)
  • The cost is adapted to the country where you live. A coupon code will appear at the top of the screen if you’re eligible for rebates applied at checkout.

We’ve had students from several continents and countries so far (France, Canada, USA, El Salvador, Uruguay, and more!), so feel free to join us and accelerate your Angular journey!