How to mock your entire backend server?

This is the last post in our series on mocking data for testing purposes. So far, we have seen how to generate mock data using Mockaroo and then how to incorporate such fake data in our Angular application.

Today, let’s push this one step further and use that same JSON data to mock our entire backend server, including CRUD (CReate Update Delete) operations, so you can also test data updates.

Enter JSON Server

JSON server is a small npm library that reads a JSON file and turns it automatically into a RESTful web server. Yes, you read that right: All we need as input is our JSON data in a file!

The format of that JSON is one single object where each property will be turned into a backend endpoint. So, for instance, say you need to support two types of data: users and teams.

Then your JSON database will look like this:

{
   "users": [ 
      // Array of all users data
   ],
   "teams": [ 
      // Array of all teams data
   ]
}Code language: JSON / JSON with Comments (json)

You would substitute those arrays with the mock data generated with Mockaroo, and then running JSON server would give you the following RESTful API:

  • HTTP GET /users => Returns the list of all users
  • HTTP GET /users/21 => Returns the user with id = 21
  • HTTP POST /user => Creates a new user
  • HTTP DELETE /user/21 => Deletes the user with id = 21
  • HTTP PUT /user/21 => Updates the user with id = 21

JSON server also supports pagination, full-text search, and custom routes if you want to add more endpoints to your test backend. Any changes you make to your data persist in your JSON file, too. This means you have a single file database for testing purposes, which is excellent!

If you want to try it, here is a complete tutorial on how to use JSON server with Angular apps. The getting started section of the npm package is also very well documented.

How to use mock data in your Angular application?

Our last newsletter covered how to generate mock data for our Angular applications with Mockaroo.

Today, we’ll cover how to use that data in our apps so it can:

  • Act as a temporary backend implementation so you can build your Angular components before the backend API is ready.
  • Use that data as mocks for your unit tests.

Using hard-coded data in our Angular apps

Let’s say we need to display a list of users in a component, but the backend doesn’t have that data ready yet, or we want to try it with fake data. We head to Mockaroo, generate a JSON file with 100 users, and then copy-paste that JSON string and assign it to a constant in our code (example here – all links in the rest of this post go to the source code of the mentioned file as well):

Then we want to access that data using a service. We already have a UserService that’s using our backend, but we want to replace that call with our fake data:

So we generate a new FakeUserService that has the same shape as UserService, but is returning a custom Observable of our mock data instead of making an HTTP request:

Finally, we change the dependency injection configuration in our AppModule so that the application uses FakeUserService instead of UserService:

And now, our AppComponent believes it’s using a real UserService, but is actually getting a FakeUserService from the Angular injector:

What’s nice and clean about that approach is that you don’t have to change any of your components. The only line of code to change to enable/disable your mock data is the providers config in AppModule. That’s it! You can access the entire code for this example on Stackblitz.

Using that same hard-coded data in our unit tests

Once you follow the above approach, using that data in your unit tests will be very similar. We can reuse that same FakeUserService by configuring the Angular TestBed in our unit tests as follows:

How to generate mock data for my application?

Testing Angular applications can be difficult because our front-end code depends almost entirely on back-end data, and setting up different database scenarios takes a lot of time and effort. Sometimes, we don’t even have enough data to test in the first place.

This is why I want to introduce Mockaroo. Mockaroo is a website where you can generate as much data as you want for testing purposes. So, for example, if you need 1,000 fake users with random email addresses, countries, and phone numbers, Mockaroo can generate all that. And you can even decide which percentage of data is left blank for each attribute.

In the example below, I decided that 10% of the email addresses would be blank:

Here is a quick JSON example I generated in a few seconds:

Mockaroo is powerful because it supports lots of different data types, such as:

  • Phone numbers, age, credit card numbers, payment card types, bitcoin addresses…
  • Street names, city names, countries, latitudes, longitudes, airport codes…
  • Names, colors, job titles, genders, SSNs, EINs, university names…

And if you need a data type that Mockaroo doesn’t have, you can provide a regular expression that Mockaroo will use to create data that matches that regexp for you. Yes, it’s that good!

You can generate data in several formats (JSON, CSV, SQL, Firebase, and more) and then either use it as mocks in your Angular application (hardcoded object) or store the data in a test database that you would use for integration testing.

Using Mockaroo is free for exports of up to 1,000 rows. Still, there’s no limit on how many exports you run daily, so you could export more random data over and over again if you need more than 1,000 items, or you can use a paid plan to increase or remove all limits.

How to update my version of Angular?

Yesterday, we mentioned why it’s essential to keep your version of Angular as up-to-date as possible.

Today, we’re going to see how to do that. A concise answer would be to use the instructions at https://update.angular.io because that’s where all the information is. You can select your current version, the one you want to upgrade to, click a button, and you get a detailed TODO list as a result:

A typical upgrade consists in:

  1. Upgrading your current version of the Angular CLI: npm install -g @angular/cli@latest
  2. Upgrading your project code to the latest version: ng update @angular/core@latest @angular/cli@latest

The ng update command will update Angular and its dependencies and even change your code if the new version of the framework has some breaking changes (meaning that some functions or classes have been renamed or replaced with something else). Yes, it’s all automatic!

There are some scenarios where the upgrade can be more difficult:

  1. For example, if you have dependencies that are not maintained anymore or that get upgraded weeks/months later – something I’ll address in a later edition of this newsletter.
  2. If a Node.js upgrade is needed by Angular, which means upgrading your dev environment and continuous integration servers.

Again, the key is to stay as up-to-date as possible to make your upgrades a 5 to 10-minute task every six months rather than a 2-week deep dive every few years.

How to generate documentation for Angular applications?

Documenting software is hard. Not only that, maintaining software documentation is even more complicated and often forgotten.

What’s the solution, then? What about using an automated solution that:

  1. Generates documentation from code comments and does not require a Wiki or any third-party software.
  2. Generates said documentation automatically and can be part of your build process.
  3. Gives metrics and feedback to developers to encourage them to write more documentation.

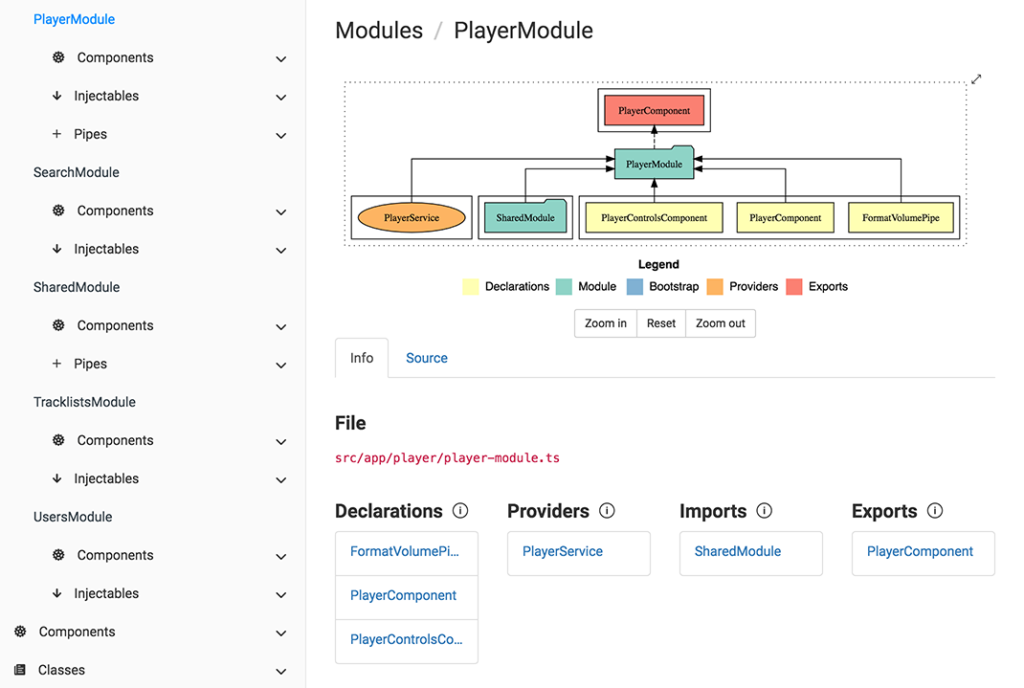
Such a solution exists. It’s called Compodoc. Compodoc can generate a Javadoc-like website from all the comments written in your application (you can see an example of such documentation here):

Compodoc can be installed globally with npm:

npm install -g @compodoc/compodocCode language: CSS (css)

Or you can add it locally to a single Angular project by running the ng add schematic in your project folder:

ng add @compodoc/compodocCode language: CSS (css)

Then you can create a config file to decide which files to include in the documentation (for instance, you might want to exclude test, and Compodoc is ready to run with a single command:

npx compodoc -p tsconfig.doc.jsonCode language: CSS (css)

The above command creates a static HTML website documenting your entire application with all modules/components/pipes/directives/services.

My favorite feature is the documentation coverage statistics that show which parts of the application are well-documented and which are not, using a report similar to test coverage reports that developers are familiar with.