Updates, debugging, and performance

This week, I want to experiment with a slightly different newsletter format inspired by James Clear’s 3-2-1 weekly newsletter. My goal is to give you three quick updates about the Angular ecosystem, two short topics to revisit, and one question to make you think differently about the code you work with daily.

Three updates to know about:

Two short articles to revisit:

How to use the Angular Devtools browser extension and the ng namespace functions for debugging.

One question to think about:

Do you know the size of your build output and regularly check or update your build budgets?

Let me know what you think about this different newsletter format. As always, it remains short and to the point.
How to cache HTTP requests with a service worker?

In the past few weeks, we’ve talked about how to cache data with HTTP interceptors, with Subjects, and with shareReplay.

While all these options work, they are intrusive and need additional code for your application. Another option doesn’t require touching your application code; it only requires additional configuration, and that’s using a service worker.

What’s a service worker?

A service worker is a small piece of Javascript code that runs in the browser independently from your application. A service worker can be an HTTP proxy between your front-end code and server. It can intercept all HTTP traffic between your Angular application and any remote server.

How to enable service workers in Angular?

Run the command: ng add @angular/pwa

That’s it! You can read more about what the command does in the official documentation. The idea is that instead of writing our service worker code, we let the Angular API take care of that and generate the service worker based on our config.

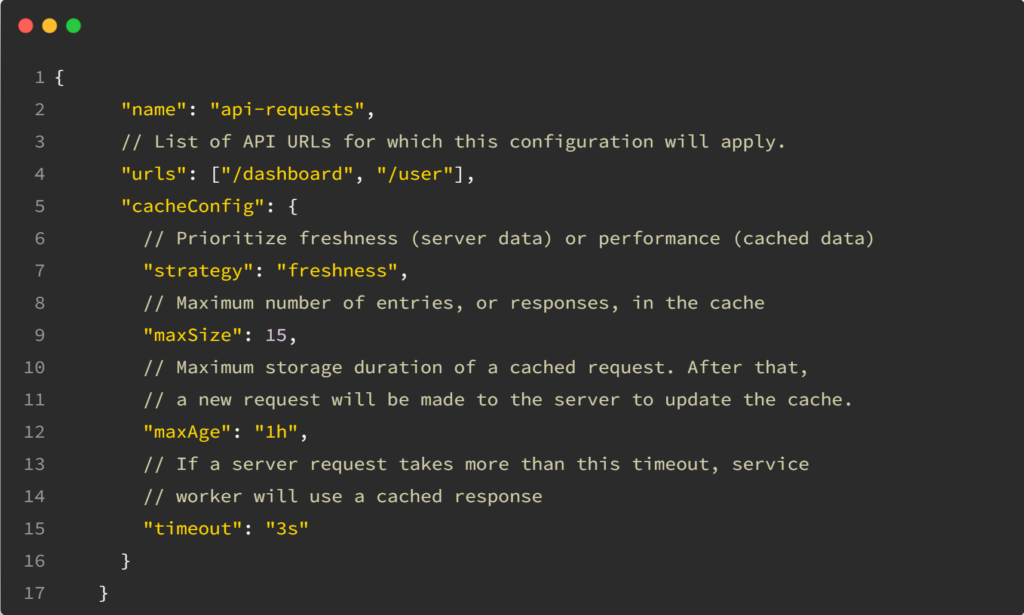
How to configure what to cache, and for how long?

Angular generates a file called ngsw-config.json. In that file, you can specify which URLs you want to cache, for how long, and if you wish to optimize for freshness (use the cache only if the application is offline) or performance (use the cache as much as possible even if the app is online).

For instance, data that doesn’t change very often (a list of countries or currencies) could be cached for weeks or months, while dynamic data (a list of Tweets or user preferences) could be cached for just a few minutes:

You can find a complete example of such ngsw-config.json here. The full documentation for all supported options can be found here.

Service workers are part of Progressive Web Apps (PWAs). If you want to learn more about that, here’s a quick PWA tutorial of mine.

Angular 17: New esbuild builder with Vite

Who doesn’t like faster builds? Since Angular 2, the Angular team has consistently worked on making our builds quicker and faster. Angular 16 included a developer preview of a new build system based on esbuild and Vite.

With Angular 17, this feature is now enabled by default for new apps, with reported speed improvements of over 67% in most applications.

To enable this new build system in existing apps (that use v16+), open your angular.json file and look for all the places where @angular-devkit/build-angular:browser is used:

Then, replace those instances with @angular-devkit/build-angular:browser-esbuild

And your next run of ng serve or ng build will automatically use this new build system. Nice and easy! If you use server-side rendering or have tweaked the builders in the past, you’ll want to look at the extra instructions listed on this page.

Angular 17: Trigger options for @defer

Yesterday, we introduced the new @defer bloc to lazy-load components on the screen. We saw that @defer includes several config options to display errors, placeholder, and loading templates.

Today, let’s focus on the possible triggers for such lazy loading.

idle

This is the default option. Will load the contents of that block once the browser is in an idle state:

viewport

Triggers the deferred block when its content enters the viewport. For instance, that would be when the user scrolls down, and the block becomes “visible.” Note that this option requires a placeholder (used to detect when the element comes into the viewport):

Another interesting option is to load the deferred block when another specified element makes it into the viewport using a template reference variable. That option does not require a placeholder:

interaction

Waits for the user to interact with the placeholder to load the deferred block. Even better, this trigger can be combined with another element so you can lazy-load a component on a button click, for instance:

The above code can be tested on Stackblitz here.

hover

Similar to the two previous examples. Waits for the user to hover over the placeholder or a specified element:

immediate and timer

immediate triggers the deferred block immediately as soon as Angular has finished rendering. Timer waits for a specified delay:

You can see most of these different examples on Stackblitz here. There are a few more options for @defer that I’ll cover later to keep this newsletter short and readable. It’s incredible what such a small API can do!

Angular 17: Lazy-loading with @defer

Angular 17 is available, and we already covered its new optional control-flow syntax. Today, let’s cover the new option to fully customize lazy-loading with Angular using @defer.

What’s great about @defer is that it does not rely on the Angular router anymore. You can lazy-load any standalone component anywhere, anytime, and on your terms, as you can decide the trigger to load that component.

Let’s start with a basic example:

The above code will load the HelloComponent as soon as the browser is idle, which means it’s done loading everything else. While that is happening, we can decide to display a placeholder, and in my case, I decided that such a placeholder would be displayed for a minimum of 2 seconds no matter what. You can use seconds (s) or milliseconds (ms) as a time unit:

You can see the above code in action here on Stackblitz. Note that the Angular Language service was updated accordingly, so VS Code (Stackblitz is a web-based VS code), Webstorm, and other IDEs already know about the new @defer syntax and do proper highlighting of it!

We can also specify a loading template and an error template, all customizable with a minimum amount of time during which we would display those templates (example on Stackblitz here):

I used “big” numbers to see the different states in my examples. Note that @loading supports an “after ” option only to show the loading template if loading takes more than a certain amount of time, so you don’t have to display anything if the component loads quickly. Both parameters are optional:

These are the different new blocks available with @defer. Tomorrow, we’ll look at the various possible triggers.

ChangeDetectorRef.markForCheck()

The following method call is either something you’re either very familiar with or something you’ve never heard about: ChangeDetectorRef.markForCheck()

If you’ve never heard about it, congratulations! It means you’ve been using Angular in a way that doesn’t require you to mess with change detection, and that’s an excellent thing.

On the other end of the spectrum, if you see that method in many places in your code, your architecture might have a problem. Why is that? As we covered before, there are two types of change detection: Default and onPush.

When we use onPush, we’re telling Angular: “This is a component that relies on @Input values to display its data, so don’t bother re-rendering that component when @Input do not change”.

The thing is, sometimes people start using onPush full of good intentions. Then, they start injecting services into their component, and when the data in those services change, the component does not re-render… So, instead of disabling ChangeDetection.OnPush (or figuring out a better way to keep their component as a presentation component), they go to StackOverflow, where people say: Just use ChangeDetectorRef.markForCheck(), and problem solved! Here’s a typical screenshot of such a response:

That’s because ChangeDetectorRef.markForCheck() does exactly that: It’s a way to tell Angular that something changed in our component, so Angular must check and re-render that component as soon as possible. As you can guess, this is meant to be an exception and not the rule.

The main reason why we would use ChangeDetectorRef.markForCheck() is if we integrate a non-Angular friendly 3rd party library that interacts with the DOM and changes values that Angular cannot see because Angular doesn’t manage that DOM. In other scenarios, we should avoid using it and think about a better architecture.

Perf and template syntax – Example 3

Yesterday, we looked at the pros and cons of our second code example.

Today, let’s cover the pros and cons of our third and final example:

Example #3 – Signal

<div *ngFor="let data of dataSignal()">{{data.name}}</div>

This last example is very interesting for a few reasons. First, if you follow Angular best practices, you might be screaming that we’re calling a method in a template, and you would discard that code immediately.

But the thing is, this is a Signal, and Signals are different. It’s perfectly fine to call a Signal in a template, and as a matter of fact, this is the way to do it so Angular knows where Signals are read and can then optimize DOM updates based on that information.

Even better, when we use a signal with ngFor, the subscriber to that signal is actually a view (an instance of ng-template) and not the entire component. When Signal-based components become part of the framework, Angular will be able to re-render just that view instead of the entire HTML template of that component.

What are the cons, then?

The only downside of Signals is that they require Angular v16+, so you’ll need to upgrade your apps to use them. The other downside is that the full benefits of improved change detection are not there yet and won’t land in v17 either, but the Angular team is making steady progress, and some early parts of Signal-based components were released in version 16.2.

Other than that, Signals are the way to go. if you’re just getting started with Angular and building a new app, I believe you should use Signals as much as possible.

Perf and template syntax – Example 2

Yesterday, we looked at the pros and cons of our first code example.

Today, let’s cover the pros and cons of our second example:

Example #2 – Observable

<div *ngFor="let data of getData() | async">{{data.name}}</div>

This code is calling a method in a template, too, and that’s a lot worse than in example #1. Here’s why: If the getData() method returns an Observable by calling httpClient.get() (or a service that makes that same call) then the async pipe subscribes to it and receives the data, which triggers change detection, so Angular calls getData() again, gets a new Observable, the async pipe subscribes to it, and there you have an infinite loop of HTTP requests that will bring down your browser for sure, and possibly your server.

How to fix it?

<div *ngFor="let data of data$ | async">

Store the Observable in a variable instead of calling a method, and the problem is solved. You can assign that Observable in the constructor of your component as follows:

constructor(service: DataService) {  
   this.data$ = servie.getData();
}Code language: JavaScript (javascript)

At this point the code is pretty much optimal because:

The only con is the async pipe syntax and working with Observables, which is often considered the most complex part of the Angular learning curve.

Performance and template syntax

Today, I’d like to challenge you with a small exercise. Take a minute to examine the three following code examples and decide which option performs best. Note how similar those three options are from a syntax standpoint, yet they yield very different results performance-wise:

Example #1 – Array of data

<div *ngFor="let data of getData()">{{data.name}}</div>

Example #2 – Observable

<div *ngFor="let data of getData() | async">{{data.name}}</div>

Example #3 – Signal

<div *ngFor="let data of dataSignal()">{{data.name}}</div>

Feel free to list the pros and cons of each approach. You can even respond to that email with your answers if you want. Tomorrow, I’ll give you my insights.

What is the Ivy engine?

You’ve probably heard about the Ivy engine if you’ve been working with Angular for some time. Ivy is the code name of Angular’s current compilation and rendering pipeline.

Before Ivy, Angular used a two-step process: Building a project would compile all Typescript code to Javascript. Then HTML templates would get compiled at runtime in the browser, using a second compiler called the View Engine. This was done for performance reasons in the past, but the toolchain and the framework evolved for much better performance using the Ivy Engine.

View Engine was deprecated in version 9 and removed from the framework in version 13. Ivy is the only option now and results in:

  • Faster builds and smaller build output. Some applications became up to 80% smaller/quicker when they started using Ivy – mostly because the View Engine compiler doesn’t need to be shipped to the browser anymore, but also because of the improved tree shaking.
  • Faster runtime experience – The application loads faster since components no longer need to be compiled in the browser.

If you’re stuck with an older version of Angular, you can look at this guide on upgrading Angular. If the guide doesn’t work, 99% of the time, the problem comes from your dependencies, and following these best practices to pick your dependencies would help.