Async pipe, Signals, and Change Detection

Yesterday, we covered what markForCheck() can do in terms of change detection and why it could be needed at times.

Regarding best practices, I often mention using the async pipe or Signals to improve change detection and performance in our apps. Why is that? That’s because both the async pipe and Signals have some extra code to help Angular detect changes.

Here’s what we can find in the source code of the async pipe:

The last line of code indicates that whenever an async pipe receives a new value, it marks the corresponding view for check, triggering the need for change detection. That’s the reason why the async pipe works well even when used in an OnPush component: Its internals override the behavior of whatever change detection strategy we use.

Signals do something similar by marking their consumers (or “subscribers,” in a sense) as dirty when the Signal value changes:

As a result, and back to the point I was making yesterday, Instead of trying to use markForCheck() directly in our code, we should rely on the tools designed to do it automatically and in an optimized fashion for us.

Conclusion: Always use the async pipe with RxJs (you can always do so) or use Signals for an even better experience.

5 useful pipes from ngx-pipes

ngx-pipes is a library with over 80 different pipes to choose from. Here is a list of 5 of my favorites:

timeAgo: An excellent alternative to Moment for duration formatting, which means turning a date/time into: “a few seconds ago” or “last week,” for instance.

ucFirst: Uses an uppercase letter for the first word in a sentence, unlike Angular’s uppercase pipe, which returns the entire string in uppercase.

filterBy: Filters an array of objects based on your criteria.

orderBy: The name says it all—orders items in an array based on a given property.

percentage: An excellent complement to the percent pipe. You can use the percentage pipe to compute the percentage value and then the percent pipe to format that value in any way you want.

You can find the complete list of pipes from ngx-pipes here. Note that those pipes are not standalone yet, but there’s a pull request to make that happen.

How to create custom pipes?

Earlier this month, we covered how to create custom directives. Today, let’s tackle how to create custom pipes. Pipes help format data such as strings, dates, numbers, etc. The first thing to do is to use the Angular CLI:

ng generate pipe [name]

or ng g p [name]

It’s also possible to generate standalone pipes with the --standalone option:

ng generate pipe [name] --standalone

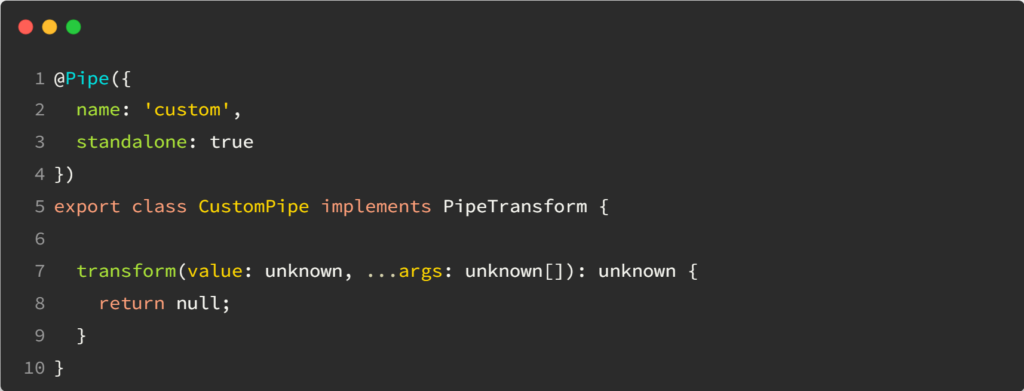
This creates a class with a single method transform to implement:

By default, the types are all set to unknown, as Angular CLI cannot guess what kind of data we want to format. As we know what we want to format and how, as well as how many arguments our pipe can accept, we can change that signature to make it more meaningful as follows:

Most pipes have optional parameters, so it’s always a good idea to have a default value for each, as I did in this example with displayPrefix = true.

Assuming we change the name of the pipe in the decorator to personName, such a pipe can safely be used as follows:

Or, if we want to turn off the prefixes, we can use our optional parameter and set its value to false:

Pluralizing text with the i18nPlural pipe

Pluralizing is as natural in human language as it is painful to handle programmatically. Let’s say we want to address the following scenarios in an app that displays the number of posts:

  • If we have zero, display “No post.”
  • If we have one, display “1 post.”
  • If we have more than one, say 5, display “5 posts.”

We could use a combination of ngIf / else scenarios to handle this, but it would get ugly quickly. The upcoming control flow API would help, but it’s not available yet.

Instead, we can use the i18nPlural pipe as follows:

The above syntax determines what to display for each scenario: 0,1 or any other value. You can find an example here on Stackblitz.

How to improve performance with pure pipes

Earlier in this newsletter, we saw that calling a method in a component template is an anti-pattern. The antidote to that anti-pattern is to use a pure pipe.

By default, all pipes we use in Angular are pure. Custom pipes are also pure by default. The only way to make a pipe impure is to add the config option pure: false to its decorator:

What is a pure pipe?

A pure pipe is one that Angular will execute only when there is a pure change to its input value. It is automatically optimized for performance since it is executed only when needed.

A pure change is either a change to a primitive input value (such as string, number, or boolean), or a changed object reference (such as Date, Array, or Object).

In other words, if we consider the following use case:

Here are some examples of pure and impure changes in variables:

With all that information, we are now equipped to call a formatting function in a template by using a pipe (said function would be called in the transform method of the pipe). We know that the function would run only when the input value changes (purely), which allows us to decide when we want that pipe to be executed again by making either a pure or an impure change to the input value.

Finally, we can double-check that our pipe is working as expected using the Angular profiler to make sure that the pipe doesn’t run more often than expected.

keyValue pipe

The keyValue pipe turns any object into an array of key-value pairs, which can be helpful for debugging purposes or working with an object with a dynamic shape.

Here’s an example:

In this example, we’re using the keyValue pipe to iterate over the properties of user and display them. The item variable represents each key-value pair in the object, and we’re using the item.key and item.value properties to display the key and value for each item.

As a result, if user is this object:

The component displays:

You can see the above example in action on Stackblitz.

This pipe is part of my collection of 3 Angular pipes everyone should know about, including the async pipe and the json pipe.

Async pipe syntax tricks

Yesterday, we wrote about how to use the async pipe to automatically subscribe and unsubscribe from our observables.

When I teach that topic, people usually have at least one of these two objections:

What if I also need the data from that subscription in my Typescript code?

At first, using the async pipe seems only to give you access to the data in your HTML templates. That isn’t the case, though, because you can still use the tap operator to “spy” on your observable and get the data from there. For instance (complete example here):

this.name$ = nameService.getName().pipe(
    tap(name => this.name = name)
);Code language: TypeScript (typescript)

And then in the HTML template:

<p>Name from async pipe: {{ name$ | async }}</p>Code language: HTML, XML (xml)

What if I need to read multiple properties from the object in that subscription?

Another way to put it is that you don’t want to end up doing something like this:

<p>First name: {{ (user$ | async)?.firstName }}</p>
<p>Last name: {{ (user$ | async)?.lastName }}</p>Code language: HTML, XML (xml)

The above code is pretty hard to read and requires one subscription for each property. This alone can be a disaster, as each subscription might trigger an HTTP request for the same data from the server!

Instead, you can do something like this, which uses only one subscription, stores the result in a local variable, then renders the data when it’s available. This technique works with any structural directive, such as *ngIf or *ngFor:

<div *ngIf="user$ | async as user">
   <p>First name: {{ user.firstName }}</p>
   <p>Last name: {{ user.lastName }}</p>
</div>Code language: HTML, XML (xml)

If changing the DOM structure by adding an element to accommodate that subscription bothers you, then you can use ng-template instead, though the syntax here can be a little bit unsettling, too:

<ng-template [ngIf]="user$ | async" let-user>
   <p>First name: {{ user.firstName }}</p>
   <p>Last name: {{ user.lastName }}</p>
</ng-template>Code language: HTML, XML (xml)

Ok, that’s probably plenty enough for today. Tomorrow, we’ll see how we can do even better than this.

How to avoid memory leaks with RxJs observables?

The easiest way to get in trouble in a big Angular application is to create a memory leak by not unsubscribing from your observables. While there are different techniques to unsubscribe your observables automatically, one is more concise, elegant, and overall the most error-proof.

That technique is to use the async pipe from the Angular framework.

Why is the async pipe such a great tool?

  1. First, it automatically subscribes to the observable, so we no longer need to call .subscribe().
  2. It returns the data from that observable, triggering Angular’s change detection when needed for our component to display the latest data.
  3. Finally, it automatically unsubscribes from the observable when our component is destroyed.

All of that with just 6 characters! (ok, perhaps a bit more if you want to count the whitespace):

<div>{{myObservable | async}}</div>Code language: HTML, XML (xml)

The async pipe works exactly like the code we would write (and thus duplicate over and over again, making our code base larger and thus our code slower) if we didn’t use it.

Check its source code here, and you’ll see that all it does is implement ngOnDestroy to unsubscribe from our observable.

There isn’t any good reason not to use the async pipe, and if you think you have some, stay tuned for our next messages, as we’ll cover some nice tips and tricks around using that pipe.

Date pipe default format and timezone

The date pipe is the most convenient way to format dates with Angular. However, very often, we need to use a consistent date format throughout our application, which means that we have to pass that custom format every time we use the date pipe:

<span>Today is {{today | date: 'MM/dd/yy'}}</span>Code language: HTML, XML (xml)

Of course, we could store that format in a constant and reuse that constant every time we use the pipe, but that’s not very convenient.

Luckily for us, since Angular 15, we can now set a default date format (and timezone) by configuring a new injection token called DATE_PIPE_DEFAULT_OPTIONS.

It works by adding the following code to your dependency injection config (array of providers) in app.modules.ts:

providers: [
  {
    provide: DATE_PIPE_DEFAULT_OPTIONS, useValue: {dateFormat: 'MM/dd/yy'}
  }
]Code language: JavaScript (javascript)

With such a config in place, we can use our pipe without any parameters and have our default formatting applied automatically in our entire application:

<span>Today is {{today | date}}</span>Code language: HTML, XML (xml)

The timezone can be customized as well with the timezone property of that same DatePipeConfig object.

Debugging with the JSON pipe

We have all used console.log at some point to debug our code. With Angular, there is an interesting alternative to display debugging information on our web page temporarily: The JSON pipe.

The primary usage is as follows:

<span>myData | json</span>Code language: HTML, XML (xml)

The above code will output your data as a JSON string in the span element, but it won’t be formatted, so the JSON string can be hard to read:

{"affiliation":"friendly","symbol":"Default Land Unit","echelon":"none","mod1":"None","mod2":"None","uniqueDesignation":"","higherFormation":"","reinforcedReduced":"","flying":false,"activity":false,"installation":false,"taskForce":false,"commandPost":"None","tacticalMissionTasks":"None","type":"Land Unit"}Code language: JavaScript (javascript)

Instead, the following syntax works a lot better:

<pre>myData | json</pre>Code language: HTML, XML (xml)

The pre HTML tag stands for “preformatted” content. As a result, that tag will preserve any whitespace, new lines, and tabs, which makes reading that JSON data a lot easier:

{
 "affiliation":"friendly",
 "symbol":"Default Land Unit",
 "echelon":"none",
 "mod1":"None",
 "mod2":"None"
}Code language: JavaScript (javascript)

It’s a simple trick, yet a big time saver when debugging code that’s using complex JSON structures.