Angular Component Testing with Cypress

Great news! Thanks to all your contributions, I’m happy to organize another coffee-fueled 2-hour workshop in January, which will be about testing Angular components with Cypress!

The date is January 18th, 2024, at 9 am US/Pacific (time zone converter here).

Like last time, the workshop will be on Zoom, and we’ll have a few hands-on exercises. A recording will be shared with all attendees after the workshop. You can register here and contribute here to keep me caffeinated.

If you have ideas for future workshops, please let me know. I do have a few, but I’m always open to suggestions.

Animated Route Transitions with Angular 17

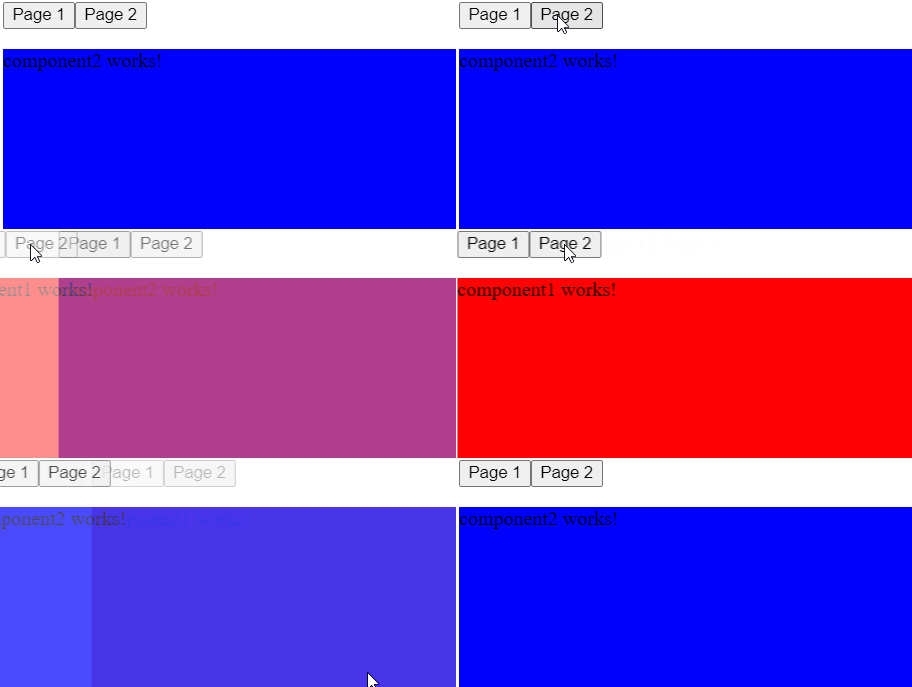
Yesterday, we covered how to generate CSS animations for our Angular applications. Today, let’s see how to use such animations as route transitions when navigating from one route to the next:

The first thing we need to do is add the right providers for animations and transitions along with our routing config:

Then, we can create two different animations: One to exit the current “page” and one to enter the next “page.” In my example, I made two animations called entrance and exit using the CSS animation generator tool:

Angular has two specific selectors for view transitions: ::view-transition-old(root) for the exit of the old page and ::view-transition-new(root) for the entrance of the new page. Our next step is to “plug” our animations into these selectors:

And… that’s it! Router animations are now in place. You can see the code for that example in action on Stackblitz.

Dynamic forms with FormArray

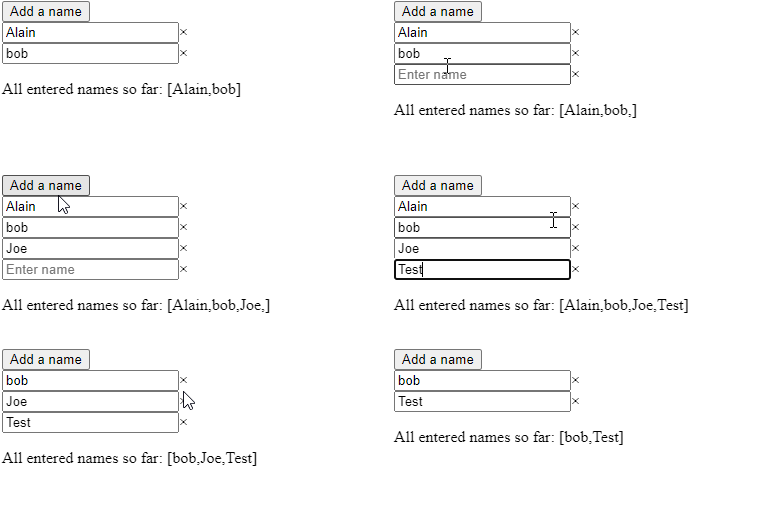
We’ve covered reactive and template-driven forms in the past. One of the nice features of reactive forms is the FormArray class. You can use FormArray for a form where the number of inputs is dynamic and can increase or decrease:

To achieve the above, we create a FormArray in our component and add a method so we can append new FormControls to that array:

Then, we use a @for block to display all controls of that array in our template, including a button to add new names to the list. Note that we store the index of each control in a local variable i:

We can even add support for the removal of form elements using the removeAt method of FormArray and the index of the element to remove:

And that’s it! We can check that the FormArray value is updated correctly with the following expression:

You can see that code in action on Stackblitz here. You can read this excellent guest post from Jennifer Wadella on my blog for more information on dynamic forms.

Prefetching with the @defer block

We’ve covered how to use @defer to lazy-load blocks of code in our Angular v17+ applications. We also touched on the different trigger options as well as the ability to create custom triggers with when.

Yet there’s more to uncover with the prefetch option:

The above code would display my-component when the user interacts with the web page, but it would prefetch the code on idle, meaning as soon as the browser isn’t busy doing anything else. That way, when the user starts interacting with the page, the component has already been downloaded (or is currently downloading) from the server, which speeds things up.

The nice thing about prefetch is that it supports the same triggers (idle, viewport, interaction, hover, immediate, timer) as the @defer block, which allows for lots of different possible customizations.

Code challenge #2 Solution

In yesterday’s code challenge, our application wasn’t displaying any data. There were two reasons for that problem:

  1. HttpClient was not provided in the application
  2. The change detection strategy OnPush wasn’t compatible with the data flow of the application

I’m including links to previous newsletter entries for deeper dives on the different topics involved in that solution. And there are quite a few subtleties to overcome.

Let’s tackle the first issue, which was providing the HTTP client. We can use one of the several utility functions for standalone app config, in our case, provideHttpClient:

The second problem can be solved in two different ways:

  1. Remove change detection onPush to use the default one instead
  2. Use the async pipe or Signals to trigger change detection in that OnPush component

Because it’s always better to use the async pipe, I’m going with that option in our template:

In our component class, I stored the Observable from our service instead of storing the data. No more constructor needed:

You can see that solution in action on Stackblitz here. We fixed our code and added some performance improvements as well by ensuring we can’t get into memory leaks and optimizing change detection for that component.

Code challenge #2: DI or not DI?

One of the cool things about teaching Angular, running an Angular certification program, and interacting with hundreds of developers (and code bases) all around the world is that I get to see a lot of good ideas but also a lot of repeated mistakes.

Today, I want to share a small code challenge inspired by mistakes seen over the past few weeks so you can learn from these examples and hopefully won’t make these same mistakes in the future.

Here is the code I want you to look at:

You can run it on Stackblitz here and fork the project to debug what’s wrong and make it work. Currently, this App component displays nothing at all, which is a problem.

I’ll give you a possible solution tomorrow. In the meantime, feel free to send me your solution if you want.

Angular Signals Workshop Next Week

It’s official! I’m running an Angular Signals Workshop next Thursday, December 14th, at 9 am US/Pacific time (12 pm US/Eastern – 6 pm Central European time). Registration and attendance are free by using this link, but your support is appreciated by buying me a coffee if you feel so inclined.

Of course, the more support I get, the more likely I am to organize similar events in the future. Just saying 😉

This workshop will be limited to 100 participants, so register as soon as possible to guarantee your spot. I’ll cover everything you need to know about Signals, starting from scratch and covering every single available Signal API in Angular 17. You’ll be able to ask questions, practice with a few exercises, and see me explain my solutions.

As a bonus, all exercises and examples will use recent Angular features such as the new control flow syntax, standalone components, the inject function, and more! That way, we’ll cover more than just Signals in the 2 hours we spend together that Thursday.

Here is the registration link again. Looking forward to seeing you there, and feel free to let me know if you have any questions before registering.

Local variables and the new block syntax

Earlier this year, I mentioned how the async pipe can become much more useful if we use a local variable instead of multiplying subscriptions to an Observable. In this example, we store the data we get from a subscription in the user variable:

While that syntax still works as is, you might want to use the new control flow syntax of Angular 17. Fortunately for us, it is possible to use local variables as well using the following syntax:

The only difference is the ; in the middle of the expression.

Using FormBuilder or FormControl?

When creating reactive forms with Angular, we have two options available. The most documented one is to inject the FormBuilder service and use it to generate your form’s structure:

FormBuilder makes perfect sense for forms that contain lots of elements. This service gives us methods that are factories for the following syntax, which is a lot more verbose:

Now, if you have a simple form with just one or two form controls, you don’t need FormBuilder. Declaring your FormControl “manually” is actually more manageable that way:

You can find an example of a single FormControl with custom validation here on Stackblitz.

How to cache HTTP requests with a service worker?

In the past few weeks, we’ve talked about how to cache data with HTTP interceptors, with Subjects, and with shareReplay.

While all these options work, they are intrusive and need additional code for your application. Another option doesn’t require touching your application code; it only requires additional configuration, and that’s using a service worker.

What’s a service worker?

A service worker is a small piece of Javascript code that runs in the browser independently from your application. A service worker can be an HTTP proxy between your front-end code and server. It can intercept all HTTP traffic between your Angular application and any remote server.

How to enable service workers in Angular?

Run the command: ng add @angular/pwa

That’s it! You can read more about what the command does in the official documentation. The idea is that instead of writing our service worker code, we let the Angular API take care of that and generate the service worker based on our config.

How to configure what to cache, and for how long?

Angular generates a file called ngsw-config.json. In that file, you can specify which URLs you want to cache, for how long, and if you wish to optimize for freshness (use the cache only if the application is offline) or performance (use the cache as much as possible even if the app is online).

For instance, data that doesn’t change very often (a list of countries or currencies) could be cached for weeks or months, while dynamic data (a list of Tweets or user preferences) could be cached for just a few minutes:

You can find a complete example of such ngsw-config.json here. The full documentation for all supported options can be found here.

Service workers are part of Progressive Web Apps (PWAs). If you want to learn more about that, here’s a quick PWA tutorial of mine.