Named router outlets

Using the Angular Router is one of the best ways to emulate multiple pages/screens in an Angular application. However, we might sometimes want even more flexibility by having the equivalent of “sub-pages” where sibling elements on a web page can display dynamic content based on the current URL.

Something like this where three different divs can display different components without a parent/child relationship:

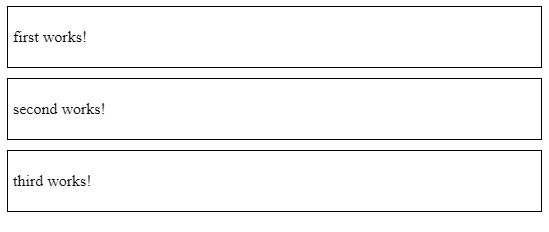
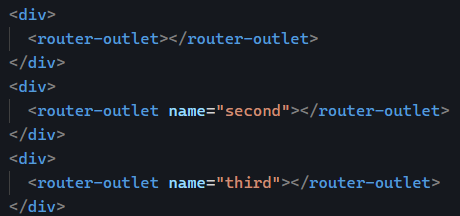
Angular allows us to have named router outlets to support such scenarios. We can define several sibling outlets by giving them distinctive names like so:

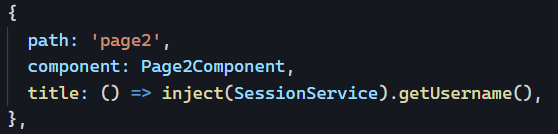
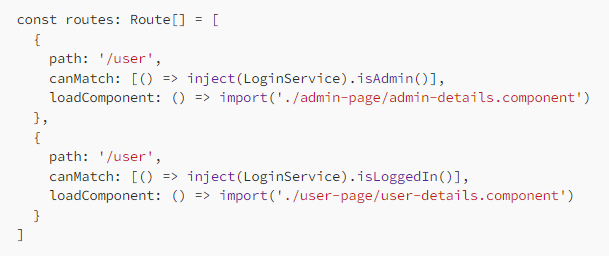
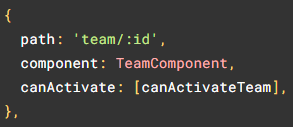
Then, in our router config, we can define which component goes in which outlet for which path:

Finally, when routing a component to an outlet, we have to repeat some of that config in the form of a rather lengthy command:

The above code will load two different components in two different named outlets. You can see a live example on Stackblitz here.

Using a resolver function or a title strategy to change the page title

Before we get into today’s topic: The Angular Team’s Request for Comments (RFC) for Angular Signals is now open to the public. Feel free to take a look and give your feedback.

Yesterday, we saw how to change an application’s title using the router config. Today, let’s cover more complex scenarios when we need a dynamic title set depending on other factors.

Using a resolver function

First, we might need some processing using a function to extract information from a service or API. In that case, we can use a resolver function that gets that data and returns it:

Note that the signature of that function allows us to return a string, an Observable, or a Promise. That way, we can make an API request to fetch some extra data if needed. For instance, in the above example, getUsername() returns an Observable (code here). This is another excellent example of using the inject function we covered earlier in this newsletter.

Using a title strategy service

For more complex scenarios, Angular allows us to create a custom TitleStrategy. Such strategy takes the form of a service that has to implement an updateTitle method:

Here is an example where I add a prefix to the title, then use the default title from the title property in the router config. Note that we could easily inject other services and perform async operations before setting the new title if needed:

Such title strategy service has to be provided as the default title strategy in our dependency injection configuration as follows:

You can see that example in action here on Stackblitz.

Changing the page title using Angular Router

This is a quick post to showcase a recent addition to the framework that is useful and very simple to implement. We can now have a title property in every route config:

The provided title is set as the page title (in your browser tab) when the user navigates from one page to the next. Just like that:

You can see a code example here on Stackblitz with a live version here. I used standalone components with the new provideRouter function just for the fun of it:

Note that there is also a Title service that can be used if you need to change that title dynamically later. Here’s a short tutorial of mine on that topic: How to change the page title and meta tags with Angular?

ngOnInit vs. constructor in Angular

Today’s post is all about clarifying when to use a constructor and when to use ngOnInit to initialize data in our Angular components.

From a chronological standpoint, the constructor is called first. Then, once all component inputs are initialized, Angular is going to call ngOnInit.

From that definition, it makes sense to use ngOnInit only when your initialization code needs a @Input value to be set. Something along those lines:

And that’s the only rule. Some might be surprised to read this, but you could initialize everything in your constructor if your component has no inputs. There is no performance impact in doing one or the other.

I would argue that triggering an HTTP request in the constructor is better as it’s going to happen sooner (we’re talking milliseconds, though) than if we do it in ngOnInit.

As a result, in the absence of any official recommendation in the Angular style guide, you can choose one or the other.

Resolver function for the Angular Router

The last router function of our guard series is resolve. It is the replacement for class-based resolvers. A resolver function runs after all guards have run and before the destination component is rendered. Such a function is typically used to preload component data before rendering it on the screen.

For instance, in this example:

heroResolver is a function that returns either some data or a Promise or an Observable of that data. Such data will be stored in the hero property of a data object returned by an Observable from the ActivatedRoute service as follows:

Of course, we could resolve multiple different pieces of data using the following syntax:

resolve: {user: userResolver, session: sessionResolver},Code language: JavaScript (javascript)

A resolver function can use the inject function to use services and resolve data as follows:

export const userResolver: ResolveFn<User> = () => { 
    return inject(UserService).getCurrentUser(); 
 };Code language: TypeScript (typescript)

canMatch Router Guard

After introducing guards and the most common guard functions (canActivate, canActivateChild, and canDeactivate), we will cover one slightly different guard that can run when trying to access a route.

canMatch was introduced in Angular 15.1. When canMatch returns false, Angular will continue looking at other routes that would match that path instead of preventing any navigation.

Let’s consider the following example:

With the above code, both routes are configured for the /user path, but if the user is an admin user, they’ll land on an AdminDetails component, and if they’re a regular user, they’ll land on a UserDetails component.

This approach can be helpful when working with multiple user roles that display different components.

Route guards – canActivate, canActivateChild, canDeactivate

Yesterday, we introduced how route guards can control whether or not a user can navigate to a new URL in our application.

The main guard to achieve that behavior is canActivate. This guard will run every time the user tries to access a path and only allow the user to proceed if the guard function returns true.

Here’s an example that’s going to check if the user is logged in before proceeding:

If we want to redirect the user to a login component when they’re not logged in, we can do so by using the Router service and returning a UrlTree object as follows:

Note how the inject function is used in all these guards to access any service we need.

canActivate works well when navigating to components. If we want to prevent the lazy-loading of a child route or prevent access to any path of the child route, then canActivateChild is what we need instead of canActivate.

Finally, if you want to prevent the user from navigating away from the current path/component, you can implement the canDeactivate guard. A typical example of such a use case is when working with complex forms where we want to make sure the user has saved their progress before navigating away from the current screen/component:

Another exciting feature is that we can access the current component itself instead of a service, which is especially useful for canDeactivate:

If you like those new framework features, I covered some more utility router functions released with Angular 14+ in this post.

How to use Angular route guards?

The Angular router has 5 different route guards that can be used to control user navigation in the browser.

Such guards can be used in scenarios such as:

  • Preventing users from navigating to parts of an application without authorization
  • Preventing users from leaving a form before it is saved or completed
  • Making sure the user is logged in before proceeding to the next page

A guard is a function (class-based guards are deprecated as of Angular 15.2) that can return three different values:

  • true if we want to allow the user to proceed (then the navigation happens)
  • false if we want to prevent the user from proceeding (then the navigation doesn’t happen)
  • A UrlTree if we want to redirect the user to another component (usually a login component or an error component)

Sometimes, we want to ask a server about the user, which means that our guard is going to do asynchronous work. That’s fine because guards can return an Observable or a Promise of the above values, which means that a guard can return any of the six following types:

Any route can be protected by one or more guards. In the router config, we define an array of guards for each route as follows:

The above code means that in order to access the path /team/:id, a user has to satisfy the requirement of canActivateTeam, a guard function that returns one of the values documented above.

The inject() function

Next in our dependency injection series is the inject() function. You’re probably familiar with injecting services using class constructors as follows:

We can also use the inject function to do the same:

The inject function can be used in 3 different places. We can use it when initializing the field of an “Angular” class (component/service/pipe/directive/module) or in the body of the constructor of such a class:

Or it can be used in a provider factory function (see yesterday’s post as an example):

For now, we can consider that function as a syntax alternative. That said, we must start using it as soon as possible because router class guards have been deprecated in Angular 15.2. And the alternative is functional guards that might need dependencies injected – using the inject function:

Conditional Dependency Injection

Yesterday, we saw how to use our component (and module) hierarchy to configure dependency injection with Angular.

Today, let’s look at how we can make dependency injection conditional. For instance, say we have a LoginService for production that requires features unavailable at dev time or that we do not want to use during the development phase.

What we can do then is configure our providers to make a decision based on the current environment:

Using the ternary operator [if true] ? [then this] : [else that], we can decide when to use a service over an alternative version.

If you need to make that dependency injection decision depending on other factors, such as data from other services, or if you have several different possible services to inject, you can use a factory function that relies on other services (deps) that are injected in the factory function as follows:

The order of the dependencies in deps has to match the order of the parameters in the factory function passed to useFactory.