Anti-pattern: Not using production builds to deploy production code

This is one of the most common mistakes I see with my training/consulting clients. When deploying code to production, they would use the command: ng build.

Instead, you want to use: ng build --configuration=production

Why is that? Because a production build is optimized in several ways:

  1. The code gets minified and obfuscated, which means it looks like this when running in a browser:

This code is as lightweight as possible (no tabs, whitespace, new line characters, variables have super short names, etc.) and a lot more challenging to understand (a hacker would have a harder time understanding your code).

2. The code gets tree-shaked. Angular removes unused dependencies and dead code and makes your build output as tiny as possible. Size matters on the web: The less code you ship to a browser, the faster it gets downloaded, parsed, and interpreted (which is also why Angular gives us lazy-loading capabilities)

3. Source maps are not generated in that same spirit of hiding what our source code looks like.

4. Angular DevTools are disabled on that code, again for obfuscation and reverse-engineering purposes.

If you’re still not convinced after reading all of this, give it a try on your Angular projects. The size of your dist folder after a production build should be at least 90 to 95% smaller compared to a regular build, which is massive.

HostBinding and HostListener

A few months back, I suggested that Angular developers don’t use enough directives and use too many components. This is because components quickly become second nature when writing Angular code, while directives are less common and, as a result, can feel more complex at first.

The critical difference between components and directives is that components have an HTML template, and directives don’t. That lack of a template can be slightly uncomfortable at first unless you realize that you still have access to HTML attribute bindings but in a different manner.

For instance, let’s consider the following component template:

Those two bindings used in a directive would become:

In other words, when you see a binding with [] in a component, @HostBinding() does the same thing in a directive.

For example: [id]="testId" in a component template becomes @HostBinding("id") testId; in a directive class.

The same goes for event listeners. This component (click) binding:

Becomes the following in a directive:

As a recap: [] become @HostBinding and () become @HostListener. Those are the same thing. That’s it. No template is needed. For a real-life example of a custom directive, feel free to take a look at this tutorial of mine.

Error Handling in RxJs

A few days ago, we saw that we could be notified of any error when subscribing using a specific callback function or that we could receive the same information using the tap operator.

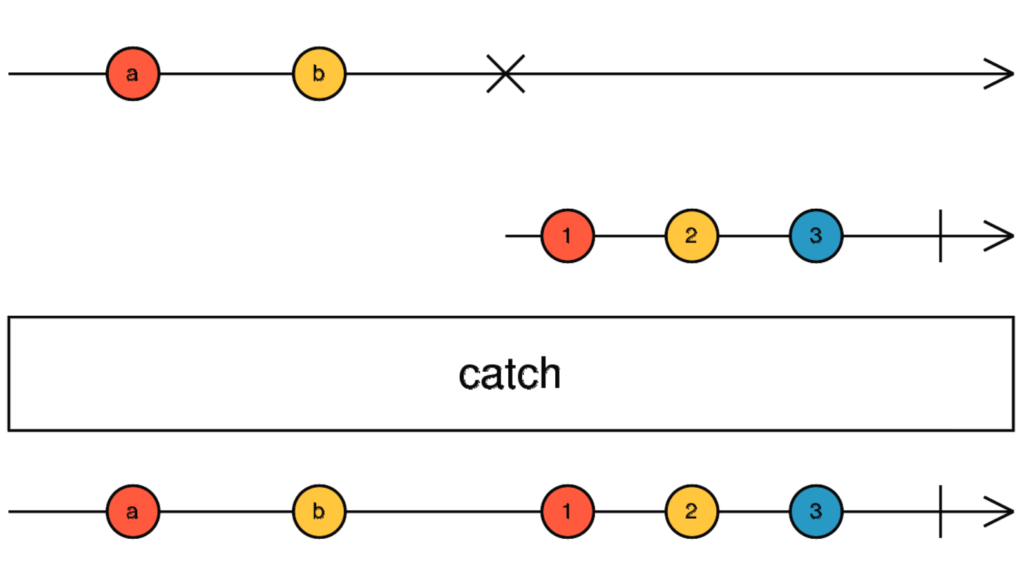
There is another option available using a specialized operator called catchError and illustrated below under its deprecated name catch:

How does catchError help? As we can see in the marble diagram, it can return a different Observable when an error happens. This means that the subscriber would have no idea that something wrong happened as we are able to switch to a backup solution (perhaps some cached data or a different API endpoint).

This is especially important when you know that if an Observable throws an error, it will never emit another value in the future. This makes catchError an excellent option to recover or at least attempt to recover from an error in the browser. We will cover other options (such as operators that retry an Observable) in the subsequent editions of the newsletter.

Signals: computed()

After introducing how to create Signals and how to update them, let’s take a look at one more exciting feature that helps replace the need for RxJs Observables.

How to emit a new Signal value when one or more Signals get updated? That’s what computed() does. In my Signals course, I illustrate computed() with the following example:

In the above code, this.rates() and this.currency() are two different Signals. this.rates() emits up-to-date exchange rates for all currencies in the world. this.currency() emits the current currency selected by the user.

computed() takes a function as a parameter. The function returns the computed value from my two Signals; in this case, the up-to-date exchange rate for the current currency. If the exchange rates or the currency get updated, this computed Signal will emit an updated value automatically.

This is somewhat similar to combining several Observables and using switchMap or combineLatest to get a customized result. It’s a lot easier with Signals (one line of code!).

Ng-conf 2023 is coming up soon

If you’re considering attending a tech conference and have never done so before, I would suggest going to ng-conf 2023 in Salt Lake City this June (also available online if you can’t travel to beautiful Utah):

You know what I’m talking about if you have attended ng-conf before. It is the largest Angular conference in the world, the Angular team is there, and the best Angular speakers are on stage (I can say so because I’m not speaking this year – but I’m going anyways!).

I have learned so much at ng-conf in the past. Several tips and tricks of this newsletter were gathered at the conference. It is safe to say that this conference helped me get where I am today as an Angular coach and consultant. The organizers go above and beyond to ensure everyone is welcome at ng-conf; the experience is always a blast.

After all, they’ve even brought a Back to the Future Delorean and a Daft Punk tribute concert to the event in the past few years – to name a few examples:

If you’re attending the conference, please let me know and come say hi. It’s always a pleasure to meet my readers. And if you’re not going… You’ll still get updates from the conference in this newsletter!

Anti-pattern series: Using too many services

While services and dependency injection are good, just like many good things in life, they can be over-used and become somewhat of an anti-pattern.

Why? Because of how change detection works in Angular. Angular has two modes for change detection: The default mode and the onPush mode. onPush is an optimization that works if and only if you’re using input-driven components, also known as presentation components.

In other words, whenever you inject a service into a component, you prevent that component from using the optimized onPush change detection mode. This is one of the reasons best practices recommend sticking with container components (service-driven components tied to specific use cases) and presentation components (input-driven ones that can be used and reused as they’re not connected to any service – and any business logic).

The more presentation components you create, the more reusable your code is, and the more change detection can be improved. The next time you inject a service in a new component, think again: Could I pass that data as @Input(s) instead of injecting a service?

If so, congratulations: You just prevented your presentation component from falling into this anti-pattern.

RxJs TapObserver

In my last post, I covered how we can define multiple callback functions when subscribing to an Observable (next, error, complete). I mentioned that those callbacks are available when we call the subscribe() method, which goes against our philosophy of avoiding subscriptions as much as possible because they can lead to memory leaks.

In previous newsletters, I covered how the tap operator can help avoid subscriptions by “spying” on an Observable.

Well, tap is a simple gift that keeps on giving. The operator supports an TapObserver interface that can be used instead of the callback function we used in our earlier examples:

As a result, we can register several side effects in our code based on any of these notifications as follows:

Most of these notifications are explicit in what they do, but let’s document all six of them for the sake of clarity:

  • next: Invoked whenever the Observable receives new data
  • error: Invoked whenever an error occurs within the Observable
  • complete: Invoked when the Observable completes and stops emitting any new values.
  • subscribe: Invoked whenever a new subscriber subscribes to the Observable
  • unsubscribe: Invoked whenever a subscriber unsubscribes from the Observable
  • finalize: Invoked whenever the Observable is done, either because of an error, of completion, or unsubscription. It’s like a catch-all notification to mark the end of an Observable.

You can see an example of such TapObserver in action here on Stackblitz.

RxJs subscribe callback functions

At this point, it is safe to assume that most Angular developers know about the following syntax. That’s how we subscribe to an Observable to receive its data:

If you’ve been reading this newsletter for long enough, you already know that there are better ways to subscribe to Observables and that there are no excuses for not using these techniques.

That said, it’s always good to know about all our available options. So here is another possible syntax:

The above syntax registers three different callback functions:

  • The first one is the same as in our first example – this is where the Observable data goes.
  • The second one is an error handler. Any exception thrown by the Observable would get caught by that callback.
  • The third callback function is invoked when the Observable completes, which means it won’t emit any more value.

Note that while that syntax still works (for now), it has been deprecated in favor of a more explicit syntax, where an object is passed. Each callback is attached to a named property, making the purpose of these callbacks more obvious:

Skeleton loaders with Angular

Skeleton loaders are grey-shaded shapes that indicate when a part of the screen is loading. Here is an example of skeleton loaders for Facebook:

ngx-skeleton-loader is a small component library that does just that. It gives us access to different skeleton loaders ready to be used in our applications:

What’s nice about that library is that we can customize different aspects of the skeletons, such as animations and colors. You can find some live examples here.

If you want to explore skeleton loaders for your application, feel free to look at my popular tutorial: How to use a skeleton loader with Angular?

The tutorial has several code examples that can be used as-is.

Two ways to update Angular Signals

Yesterday, I wrote about some best practices around exposing a Signal in our Angular applications. Let’s now take a look at the two different ways a Signal can be updated.

set()

The easiest way to update a Signal is the set() method. Nice and easy for basic data types such as strings or booleans:

update()

When the new value of a Signal depends on its previous value, update() is the best method to use. This is the ideal method for a counter, for instance:

Here is how to increment the counter based on its current value:

TL;DR

  • When you need to update a simple value (string, number, boolean), use set().
  • If that new value is based on the previous one, use update() instead of set()